Understanding Surface Quality: Key Metrics Explained
Surface quality is one of those quietly powerful parts of manufacturing. It does not always get the spotlight, but it can decide whether a part glides, wears, seals, reflects light, or behaves like a well-trained piece of machinery instead of a grumpy one. If a surface is off, the whole part may still look fine from across the room and then misbehave up close, which is a very expensive magic trick.

Why surface quality matters
Surface quality affects both function and appearance. A smoother, more controlled surface can reduce friction, improve sealing, help parts last longer, and make assemblies fit together more reliably. That matters in everything from bearings and hydraulic components to cutting tools and medical parts.
Think of it like the difference between a freshly paved road and one that was “finished” with a shovel and optimism. Both may technically be roads. Only one is pleasant to travel on.
- Functionality: rough or inconsistent surfaces can increase wear, leakage, and vibration.
- Durability: the wrong texture can speed up fatigue and shorten part life.
- Customer perception: visible surface defects can make a precision part look sloppy, even if the dimensions are right.
For a broader manufacturing context, the surface roughness concept is a useful starting point, while official measurement guidance from the ZEISS Metrology roughness overview shows how industrial teams often translate that concept into practical inspection steps.
Key metrics: the three terms you will see most often
Surface quality is not just “smooth” or “not smooth.” The usual metrics each describe a different layer of the story.
| Metric | What it means | Simple way to think about it | Why it matters |
|---|---|---|---|
| Roughness | Very small peaks and valleys on the surface | The tiny texture you feel when you run a fingertip over a part | Impacts friction, wear, sealing, and contact behavior |
| Waviness | Larger, broader variations in height | The slow up-and-down “rolling hills” under the texture | Can affect fit, vibration, and functional stability |
| Lay | The main direction of the surface pattern | The grain of the surface, like brush strokes in paint | Influences how the surface contacts another part or sheds fluid |
In many shops, roughness gets the most attention because it is easy to measure and easy to blame. But waviness and lay can matter just as much, especially in sealing surfaces, sliding interfaces, and parts that need a predictable contact pattern.
Roughness
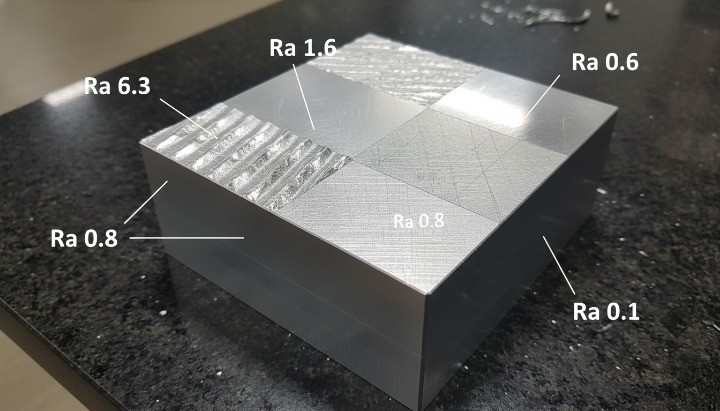
Roughness describes the fine-scale texture of a surface. It is often reported with values such as Ra, Rz, or similar parameters, depending on the standard and application. The important part is not memorizing the alphabet soup; it is understanding what the number represents in practice. A lower roughness value usually means a finer surface, but “lower is always better” is a trap. Some applications actually need a controlled texture to hold lubricant or improve bonding.
Waviness
Waviness is the bigger, slower shape variation underneath roughness. Imagine a road surface again: roughness is the grit in the asphalt, while waviness is the gentle rise and fall of the road itself. Waviness can come from machine vibration, fixture issues, thermal changes, or process instability. If roughness is the handwriting, waviness is the sentence structure.
Lay
Lay is the dominant direction of the pattern on the surface. It often reflects the machining method, tool path, or finishing process used. A brushed surface, a turned surface, and a milled surface can all have different lay patterns, and those patterns can influence how a part seals, wears, or reflects light.
How surface quality affects performance
These metrics are not just lab-room trivia. They show up in real parts every day:
- Sealing surfaces: too much roughness can create leak paths.
- Sliding parts: poor surface control can raise friction and heat.
- Precision assemblies: waviness can lead to uneven contact and inconsistent load distribution.
- Visible components: poor lay or uneven texture can hurt the final appearance, even if the part functions.
That is why surface quality often sits at the crossroads of design, machining, and inspection. A part can be dimensionally correct and still underperform if the surface finish is doing its own little rebellion.
How to measure surface quality
There is no single perfect method. The right measurement approach depends on the part, the tolerance, and the kind of texture you need to understand.
Contact methods
Stylus profilometers use a small tip that traces across the surface and records height changes. They are common, practical, and widely understood. Their strength is repeatability. Their weakness is that they only sample along a line, so they may miss broader texture patterns if you choose a poor measurement direction.
Non-contact methods
Laser scanning and optical methods collect surface data without touching the part. These tools can be useful when you want faster coverage, fragile surfaces, or a broader view of the texture. They can also be sensitive to reflectivity, part geometry, and setup quality, so they are not magical truth machines. Nothing in metrology is magical for long.
For deeper technical background, the NIST roughness reference material is a solid public resource for understanding how roughness standards are approached in measurement practice. If you want a broader standards overview, the ISO standards catalog for surface texture shows how widely the topic is formalized in industry.
Choosing the right method
A practical rule: match the method to the question. If you need a fast shop-floor check, a stylus tool may be enough. If you need a fuller picture of a complex surface, a non-contact system may be better. If the part is sensitive, soft, or highly polished, avoid a method that could mark or distort it.
- Use stylus profilometry for routine, well-defined roughness checks.
- Use optical or laser methods for complex geometries or non-contact needs.
- Confirm measurement direction so lay does not hide the real result.
- Check calibration and setup before trusting a beautiful but suspicious number.
If you are building a process evaluation workflow, our blog covers related articles on machining setup, finishing checks, and process comparison methods that can help connect measurement with production decisions.
Common challenges when interpreting results
Measuring surface quality is the easy part; agreeing on what the numbers mean can be the real sport.
1. Understanding specifications and standards
Surface texture callouts can vary by industry, drawing standard, and customer expectation. Two drawings may both say “good surface finish” in spirit, but only one gives you enough information to act on. Make sure you know whether the requirement refers to roughness, waviness, lay, a cutoff length, a direction, or a specific standard.
2. Interpreting the data correctly
A single reading rarely tells the whole story. Sampling location matters. Measurement direction matters. Even the size of the scanned area matters. A low value in one spot does not automatically mean the whole part is acceptable. This is where process discipline saves embarrassment later.
3. Picking the right tool for the job
Some tools are excellent at one type of measurement and awkward at another. A method that works beautifully on a flat coupon may struggle on a curved or delicate part. Before buying or borrowing equipment, ask: what am I trying to prove, how repeatable does it need to be, and who will use the result?
Practical tips for better measurement
- Start with the application: define whether the surface needs to seal, slide, reflect, bond, or simply look acceptable.
- Measure in the relevant direction: lay can hide or exaggerate the result if the trace runs the wrong way.
- Use the same setup repeatedly: consistent fixturing, cutoff settings, and locations make comparisons more reliable.
- Document the process: note the tool, method, location, and settings so results can be repeated later.
- Compare against function: do not chase a number just because it looks tidy on paper.
In other words: do not let the measurement become a decorative spreadsheet. The number should help the part behave better, not just look smarter.
Conclusion
Surface quality is a small detail with a very loud personality. Roughness, waviness, and lay each describe a different part of the surface story, and together they shape performance, durability, and appearance. The best measurement strategy is the one that matches the part’s actual job and gives you data you can trust.
If you are improving a production process, start with the function, choose the right metric, and measure in a way that reflects reality rather than wishful thinking. That is the boring magic of good manufacturing: fewer surprises, fewer scratches, and fewer “why is this leaking?” moments.